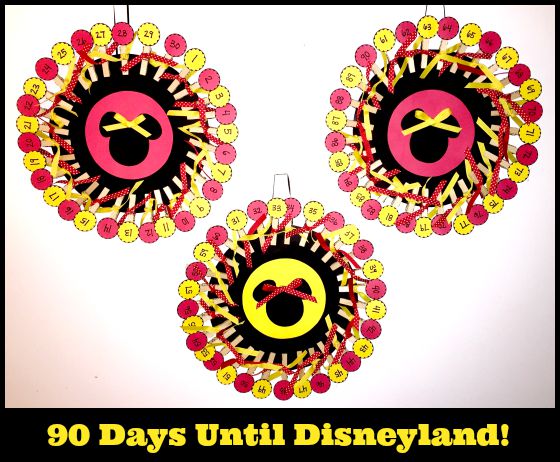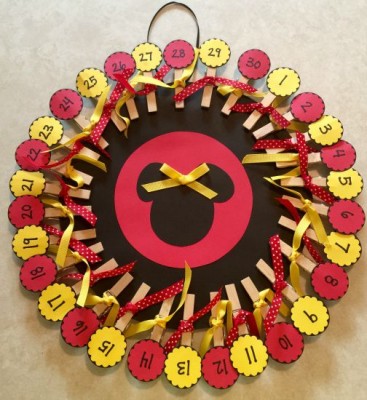
There’s nothing quite like the anticipation of counting down for your upcoming Disney vacation. And when you visit the Mouse as often as we do, it seems like there’s always a next trip on the horizon! Our family has tried a few different countdown crafts in the past, including a movie-a-week countdown and a paper-chain countdown.
While these countdowns were fun, they weren’t particularly reusable. And it can get tedious creating a new countdown craft for each trip when you travel 4-5 times per year. So for our upcoming November vacation – our first trip to Disneyland and a milestone birthday celebration! – I decided to go all out and get creative with our countdown. Because this countdown employs clothespins, which can be pulled off without damaging the base, we’ll be able to reuse it over and over again to countdown exciting events yet to be planned.
If you’re ready to start counting down the days until your upcoming Disney adventure – follow along to find out how to make your very own clothespin countdown! Let’s DIY Disney!
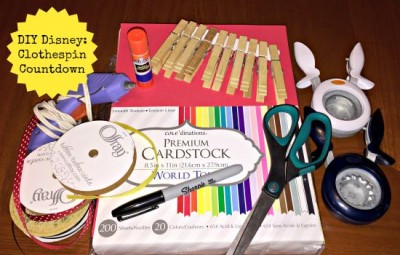
Supplies:
- Several sheets of Cardstock in your favorite colors
- For my countdown, I used the classic Mickey colors of red, yellow, and black
- 3/8” thick Ribbon in your favorite colors (2 – 12’ spools of each color)
- For my countdown, I chose yellow ribbon and Minnie-inspired red and white polka dotted ribbon
- 1.5” Diameter Smooth Circle Paper Punch
- 1.5” Diameter Scalloped Circle Paper Punch
- Wooden Clothespins
- You’ll need 1 clothespin per day of your countdown; for my countdown I used 90 clothes pins
- Glue Stick
- Permanent Marker (or number stickers)
- Scissors
- Hot Glue / Glue Gun
Step 1:
Decide how many days you’re going to count down. The clothespin countdown works best in 30 day increments, so I chose to make 3, 30-day countdowns, to provide my family with 90 days of countdown fun. Another plus of the countdown is that it can serve as a reminder for approaching vacation-planning deadlines. For example, as my family approaches the 60-day mark for our upcoming Disneyland vacation, I know that I need to get ready to start planning our Dining Reservations.
Step 2:
Using the smooth edge paper punch, cut circles out of cardstock. You’ll need one smooth-edged circle for each day of your countdown. I used black cardstock for my smooth-edged circles.
Step 3:
Using the scalloped edge paper punch, cut circles out of cardstock. You’ll need one scalloped-edged circle for each day of your countdown. I used red cardstock for half of my scalloped-edged circles and yellow cardstock for the other half.
Step 4:
Using a permanent marker (or number stickers), number your scalloped-edged circles. If you’re using more than one color of cardstock, I’d suggest alternating your numbers in a pattern. For example, I wrote all of the even numbers on red cardstock, and all of the odd numbers on yellow cardstock.
Step 5:
Using your glue stick, adhere the scalloped-edged cardstock circles to the smooth-edged cardstock circles (numbered side facing up).
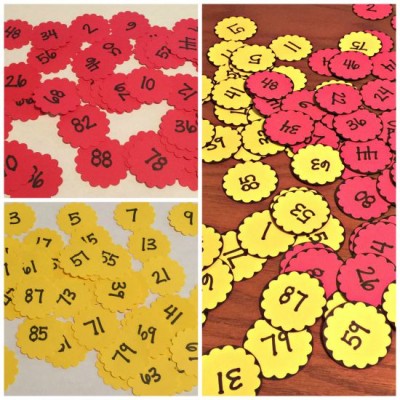
Step 6:
Hot glue each of the numbered cardstock circles to top of a clothespin. Make sure to attach the circles to the end of the clothespin that you squeeze to open it (not the “pinchy” end).
Step 7:
Cut the ribbon into approximately 9” pieces. You’ll need 1 ribbon for each clothespin (so that’s 1 for each day of your countdown).
Step 8:
Tie the cut ribbons to the center of each clothespin. If you’re using more than one color, I’d recommend alternating colors in a pattern. For example, in order to create a fun, contrasting pattern, I tied yellow ribbons to the clothespins with red circles, and tied red ribbons to the clothespins with yellow circles.
Step 9:
Using scissors, cut a large circle out of cardstock. This will be the “base” of your countdown. In order to successfully fit 30 clothespins around your base, the circle should be approximately 11” in diameter. Tip: I traced the opening of a large mixing bowl as a template for my base, and used black cardstock.
Step 10:
Using scissors, cut a smaller circle out of a contrasting color of cardstock. This circle should be approximately 6” in diameter. I used red cardstock for the center circle on 2 of my bases, and yellow cardstock for the third.
Step 11:
Decorate the center (6”) circle. I chose to decorate mine with a black Mickey head and contrasting bow (using some of my leftover ribbon). I decided not to add any text indicating the reason for the countdown, because I wanted to be able reuse it for any type of future trip. But it could also be fun to add text, such as “Days until Disneyland,” or “Gardner Family Vacation.”
Step 12:
Using the glue stick, attach the decorated smaller circle to the center of the large (11”) circle base (decorated side facing up).
Step 13:
Clip your decorated clothespins around the edge of the base, in numerical order.
Step 14:
Depending on how you’re planning to display your countdown, you might choose to attach a ribbon loop to the back of the base, in order to hang the countdown from a hook/nail. I’d recommend hot-gluing the ribbon to the back of the base, and covering it with a small piece of leftover cardstock.
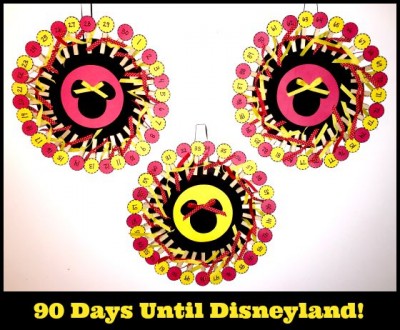
And that’s it – you’re ready to display your masterpiece and begin counting down the days until your magical vacation! And if you’re a family of Disney-fanatics like we are, once you return home, you can clip the clothespins back on and start the countdown craziness all over again!
How many days are left until your next Disney trip? Have you made a creative Disney vacation countdown? We’d love to hear about it in the comments!
Incoming search terms:
- https://www themouseforless com/blog_world/diy-disney-clothespin-countdown-craft/
